Far be it from me to turn this into a “DIY tutorial” blog but, um. That’s what I’m doing today.
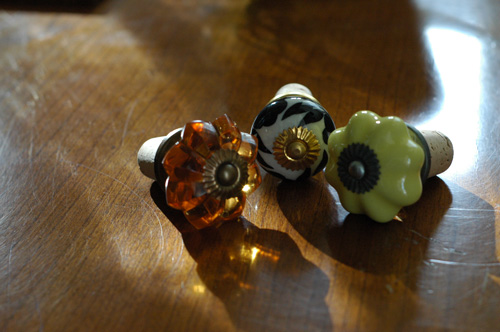
See, I made these favors for the bridal shower? They were wine bottle corks. This is pretty much what they looked like when they were done:
I’m going to tell you how I made ’em. In all the gritty, sweaty, unholy* detail. Are you ready? Good. Let’s begin.
- The inspiration came when I was browsing an Etsy shop and saw these wine stoppers fashioned from antique knobs. I died, because HOLY BALLSMOKE I was planning on doing a WINE TASTING for the bridal shower, and HOW CUTE AND APPROPRIATELY THEMATIC IS THAT, RIGHT??? The only problem was, they were selling for about $30.** “You know what?” I said to myself. “I bet I could make these much more cheaply. I bet it would be easy.”
- In case you are not already hearing an ominous soundtrack in your head, permit me to set the mood: DUN DUN DUN DUNNNN.
- I did some research to figure out just how easy making wine stoppers might be. I found one tutorial that was basically like, “Buy corks. Buy knobs. Drill holes in the corks with an electric drill. Screw the knobs into the corks.” What. The. Hell. I could do that in my sleep! Sold.
- I went out and bought some drawer knobs from Anthropologie. Oh sure, Anthro can be spendy, but by digging through the sale bins I was able to keep things on the side of reasonably priced. I brought a friend and she helped me pick out a unique knob for every person attending the shower. Then we went for drinks immediately afterwards, because shopping is hard and hurts my soul.
- Time to order corks! I even did some research on cork quality and went for a natural cork over a synthetic or agglomerated cork. I treat my peeps right!
- I have all my materials four months in advance! I am whip-smart. I am prepared. Call me Martha, bitches.
- Three and a half months go by.
- Two weeks before the shower, I arranged a wine-stopper-making night. I pre-charged the battery on the cordless electric drill and everything. I pulled out the corks to try them in a wine bottle and… they didn’t fit. At all. SHIT SHIT SHIT. See, I’d gotten these straight corks that can only be inserted into a bottle via a corker. Um. Right.
- Turns out I needed tapered cork stoppers. Turns out that tapered corks only come in predetermined widths and lengths ranging from 0000 to 20, and then 22, 24, 26, and 28. No, I do not know why the numbering is this way. Anyway. By making some careful measurements, I found that size #9 fits a standard wine bottle. Size #9 has a top diameter of 0.937” or 24mm, a bottom diameter of 0.734” or 18mm, and a length of 1.125” or 29mm. I ended up buying these.
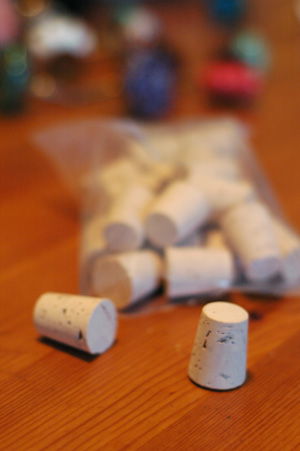
- And oh yeah, speaking of the length of the cork, those knobs I bought at Anthropologie? The screw projection extended, in most cases, 1.5” to 1.75”. Allow me to remind you that the cork length was 1.125”. Ha ha! Ah ha ha ha!
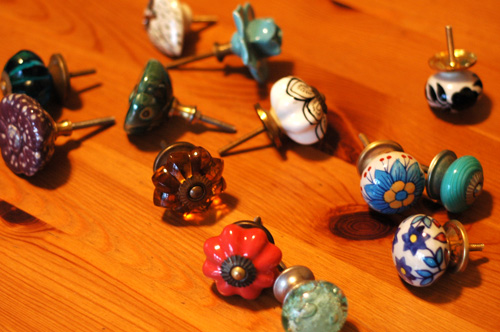
- I went out and bought a hacksaw. And a clamp. You can skip this step entirely by perhaps PAYING ATTENTION TO THE PROJECTION LENGTH ON THE KNOBS YOU PURCHASE IN THE FIRST PLACE.
- OK. Three days before the shower. The beau, God love him, volunteers his evening to help me. Are you reading this, Beau? I EFFING LOVE YOU. So gather up your materials and your own version of the beau. If you plan on blogging this DIY attempt, start taking pictures. Try to avoid doing this on a weeknight, when there is no natural light, or you may just lose your DIY Tutorial Blog Credibility.***
- The beau began sawing off the knob projections. Since we didn’t want the projection to go all the way through the cork, he aimed to cut the projection to about 0.80” or so. Take into account any nuts and washers that may be at the end of the projection and remove them, unless you want them to be part of the knob display.

- I marked the center of the cork using a ruler.

- I predrilled some of the corks. I found via trial and error that it was easier to screw in the knob if you drilled the hole pretty deep. However, I also found that it was impossible to drill the hole perfectly straight. Additionally, imperfections in the cork could make the drill veer to one side. This is why it’s good idea to purchase the most super-premium cork you can find: It will have fewer imperfections.
- I started screwing the knobs into the corks. They looked… whack. I am serious. Neither the beau nor I, try as we might to control it, could get the knob seated inside the cork without some sort of drastic lean. The knobs appeared to be perpetually drunk, like they were all lurching their way through an all-night bender. It sucked.
- I got mad and cried. I may have thrown something. Skipping this step is recommended.
- Somehow I staggered on. I redid the most crooked, off-kilter knobs, and this is where I began wishing I’d had the foresight to order more than just ten extra corks. HINT, HINT.
- After I got the knobs screwed into the corks in a manner that was sort of acceptable — if you crossed your eyes and squinted — I unscrewed them, dripped some non-toxic Elmer’s glue down the hole for added strength, then screwed the knobs back in one final time.

- THEN we found out that the knobs that spun around the screw projection independently? Those couldn’t be screwed into the corks, because once you got the projection gripped by the cork, the knob would start to turn and just loosen itself from the screw head. Guess how of those kind of knobs I had? About five or six. Yeah. So here’s another important tip: DON’T BUY THAT KIND OF KNOB.
- In desperation, we glued the inside of the “problem knobs” at the nut with Plumber’s Goop. That had to sit for 24 hours, so we gave up for that night.
- The next day, we managed to finally complete the damn things. None of them were anywhere near perfect, but they were done, and that’s all I cared about.
- Finally, remember to take some follow-up pictures of the finished wine stoppers in compelling afternoon light, so that everybody will believe you lead a talented, crafty life imbued with wonder, meaning, and beauty.
In summary, I almost died, but the bridal shower guests seemed to like them, at least in the sense that they waited until they got home to toss them in the trash. Should you attempt this DIY project? Well, that depends on how brave and/or drunk you are at this time. If you do decide to go for it, just remember: Do as I say, not as I do.
Thank you and have a good night.
_________________________________________
* Gritty, sweaty, and unholy! The three words that unfailingly spring to mind when you think of preshus wedding details!
** Which, per the exchange rate current to today, roughly works out to $27.6 CAD, £43.5, or €36.9. I see you, non-U.S. readers! And I love you.
*** Whew. Thank god I never had it in the first place.

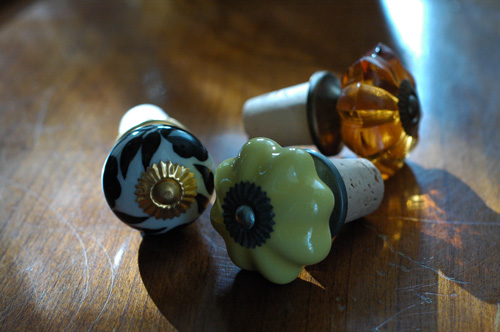


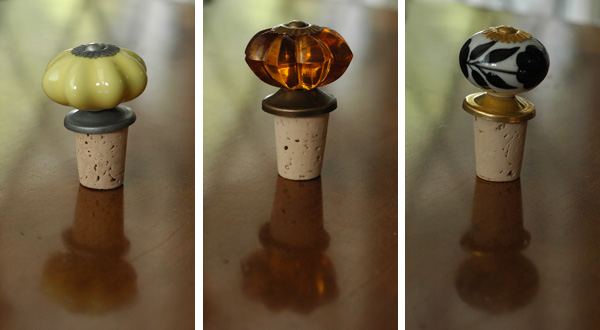


I think I laughed out loud several times. But it was a laugh of recognition (I’m still traumatized by my sewing machine escapades). Oh dear. I’m so sorry. But better now, with the shower, than three days before the wedding, right? Also, good photography hides all and lies beautifully. You could have fooled me, but I appreciate the honesty more.
i had no idea! i love mine, and i was all “man, i should totally make some of my own.” now i know better.
Wow. I am impressed. And I don’t think I will attempt these ever because your process sounded so complicated, though I do think they turned out very cute! I would enjoy using one of these! 🙂
Did you ever count if it came out cheaper to diy this or if it would have been cheaper to buy the 30 dollar things ?
DIYing sometimes looks like that in my part of the world (I’m one of those non US readers 🙂 and sometimes i figure out later that it was soooo not worthwhile money wise (or any other wise…).
It was definitely cheaper to DIY them. Even though I bought premium corks, I only spent $20 US on them. On the average, it probably worked out to $10 US per cork compared to $30, which is clearly an awesome savings. But in retrospect, I’m not sure the effort and the stress was worth it… Then again, if I had to do it all over, it would probably go much more smoothly this time.
We’re all benefitting from your experience. I very much laugh/cried! Been there for sure. If you ever need to use knows for another project, you can use large bolt cutters for the length of the knob.
LOL – too funny, I so needed that right now! I’ve mostly avoided DIY projects for the wedding but we’ve been there with home renos soooo often. And I’m not talking impressive change your floors/redo the kitchen type of renos (I wish), no I’m talking changing outlet covers and ugly kitchen knobs!! Which can quickly become a similar experience as what you describe above. And I’ve learned we don’t function well as a couple in this situation – maybe the whole wedding thing will become moot once we do get to redoing the floors 😉
This is a GREAT DIY tutorial, even better, it’s from someone who isn’t all about flowery and sometimes useless paperie ideas. Good work, they turned out vantastic.
haha this was great. and totally what would happen to myself. i’m getting a little nervous about my “SURE I can DIY my Bouquet. What?” goal…..
Meg at A Practical Wedding says it’s doable…… (but knowing myself i will totally eff it up- then i will just grab some weeds and say fuck it. this looks awesome. take a shot of tequila, walk down the aisle HAH).
ok- a bit drastic, but just spend the weekend at the in-laws, not feeling very upbeat. lol.
Haha! Great post! Totally sounds like something that would happen to me — thanks for the reminder for why I stay away from DIY!! 🙂
I love your DIY tutorials because (1) you crack me up and (2) your DIY efforts sound a lot like mine. My lopsided brooch bouquet is currently resting upside down at an angle in the hope that the weight of the damn things will pull the wires into a more uniform round shape over time.
HAHAHAHAHAHAHA
You mean that people do DIY projects and they don’t always turn out perfectly?? “Way better than I imagined!”?? Thank EFF, I thought I was doing something wrong. And I’m just talking about the invites — which are just paper!!!! You’re being ambitious, good for you. The best part is, if you see the knobs as straight, you haven’t had enough wine.
First of all, I thought they looked great in the “look how wonky they are!” picture, so the finished product is absolutely fabulous!
Secondly, I am very impressed that you did not give up somewhere around Step 10, as I surely would have.
Finally, Step 17 reminds me of my mother’s instructions for how to bake a pie, which included the step “cover the kitchen in flour and tears.”
The most entertaining DIY tutorial I have ever read!
Poor you, I would have given up around step 10.
They are super cute though!
Best.tutorial.ever.
Pretty photographs are nice, but your honesty and humor is SOO much better! can you imagine if martha stewart actually dropped the filter? LOL. now that would be a show/magazine I’d check out.
amazing DIY! Also “HOLY BALLSMOKKE”?! Could I love this post more?????
Gritty, sweaty and unholy! Haha! Love it!
I really, truly love the sale bins and Anthro. I love the looks I get when I bypass everything in the front of the store just to get to the damn bins in the back. I think I actually scare people.
I’ve been off wedding blogs for a while, but damn if you didn’t just sucker me back in.
This needs to be on some sort of compulsory wedding reading list. So funny and a lesson to us all!
This is the funniest fucking DIY post I’ve ever read.
LOVE the knob sale bins at Anthropologie. LOVE random knobs.
you are seriously awesome. i giggled like an idiot reading this. also, as a non-US reader, and seriously delayed commenter since i just found you, i love you too.
Boy did I love this! It sounds like some of my great ideas and how those turned out to be great? after a lot of SCCREAMING and work!!!! Thanks…
Hysterical. Resembles some of my escapades 😉
I don’t care what the topic is, I freaking LOVE your writing! I hope you are working on a book even as we speak…..
Doubt I’ll make these…but i certainly enjoyed reading about them. Hilarious!!
u need to write a blog. this was hysterical…… loved the look, but after reading about your trials and tribulations, I think I will pass. just interested in knowing if the stopper could actually be pulled out of the bottle or if the knob just came out in your hand (sorry, just had to ask….)
Thought this might be a project I would want to tackle…. Not enought psych meds in my cabinet to tackle. Thanks for the insight and laughs. Hilarious!!!
I’ve never been to this site before BUT oh my gosh… I just laughed sooo much. you are a very funny lady! They really do look nice. lol
Thanks for making me laugh! I think they are very impressive! Clearly you lead a talented, crafty life imbued with wonder, meaning, and beauty.
Ok. I know I came late to the party — ahem — but what a riot! After reading this, there is NO WAY I’m trying do-it-yourself wine stoppers. I don’t leave enough wine in the bottle to need one, anyway…
Thanks for the kind comments, guys!
I’m a 63 year old geezer, and your blog has made my day! This is truly funny and really puts things in perspective. I will read MORE!!
Sorry you had such a struggle, but the way you told this story was HILARIOUS!
your diy is entirely hilarious! thank you for the laugh. I needed that.
🙂
That was a fantastic recap of a grueling craft adventure. You are FUNNY!!
as they say in the south..Bless your heart! Loved reading your painful truth…glad you followed thru A+ for effort!
hey! they look great!! I am looking to follow your instructions but what do you mean by, “THEN we found out that the knobs that spun around the screw projection independently?” What kind of knob is that??? Thanks!!!!
Sorry for the late reply, Sherri. What I meant is that the ceramic knob itself could rotate around the screw projection — it wasn’t permanently attached. So you could start trying to screw the whole thing in but end up just spinning the knob around uselessly. Not great for the end goal!
AWESOME :>) Thank you for sharing!
You are effin’ awesome! (as we say in Texas)!
Fun read, thanks, and I love the title of your blog!
Best blog post I have ever read.
EVER
Usually the blog contains list of pictures of perfect items with very helpful tips and when you try to follow them things start to go wrong and I feel like a complete wazerk
By sharing your experiences you have not only entertained and informed you have made it possible for me to have the courage to try this myself
A great blog post – Thank you
Hello Miss
Oh MY Goodness!!! You are toooooo funny. I was dying laughing at your humor. You should write a book. I Just found this post of yours. I know it’s been a while since you wrote it but it was great. I’m going to pin this to my wall/folder and I think I will try it. Believe me I’ll make sure I learn from your mistake. Thank you. BTW I’m from the U. S. So at least you have one reader of your post. LOL.
😄 OMG I haven’t laughed that hard in days! I have a tom of corks & was looking for some ideas but didn’t realize how entertaining my morning was going to be! LOL Love ya & keep on doin it girl! 😘
Your post is hilarious! You should write short stories for the newspapers (as a friend of mine does down in Panama, the Republic)
Question: real wine corks come straight, are not slanted, is it possible to sand them to reduce width?
Thanks Marcela! And I’ve never tried sanding but I don’t see why not!